Connect to Jupyter server directly
Juno Connect lets you use your Jupyter server remotely on your iPad or iPhone by either connecting directly (via HTTP/HTTPS), or by establishing a secure SSH tunnel and using SSH port forwarding. Follow these steps to connect to your server directly, without SSH tunneling.
Do I need this?
Juno Connect supports two types of connection: direct and port forwarding. Which one to use depends on your particular circumstances, but generally speaking:
- It is easier and more secure to use port forwarding connection. Especially so, if you plan to access your Jupyter server from outside of your local network (i.e. over the internet).
- Alternatively, it should be reasonably safe to use direct connection when you connect to a server in your local network — say, your laptop or PC, which is connected to the same Wi-Fi.
However, it should be possible to use either connection type for wherever you are connecting from, of course. This guide explains how to connect directly, for connection using SSH port forwarding see: Connect to Jupyter server using SSH port forwarding.
Prepare your Jupyter server
In order for your Jupyter server to start accepting incoming connections, there are several things you need to configure first. You can create a config file (if you don’t have one already) with all the defaults commented out using the following command:
jupyter notebook --generate-config
You can now edit generated configuration file and enable two options, which will allow your server to accept incoming connections. Either uncomment corresponding lines, or simply add these settings at the bottom:
c.NotebookApp.allow_remote_access = True
c.NotebookApp.ip = '*'
See Jupyter Documentation for more info on config files and configuration options.
That’s all you need to configure in order to connect to a server in your local network.
If you would like to connect directly to a server from outside of your local network, there are a few more steps to take. Essentially, you will need to configure a public Jupyter server, which means anyone on the internet will be able to connect to it. Exposing it like that requires several further security measures: you should secure your Jupyter server with a password, and only make it available via HTTPS by providing a TLS/SSL certificate and key file in Jupyter config. Follow this tutorial to prepare trusted certificates for your Jupyter server: Accessing Jupyter on iOS over HTTPS, or, alternatively, consider connecting via port forwarding instead.
See Jupyter Documentation for more info on how to run a public notebook server.
Add server configuration in Juno Connect
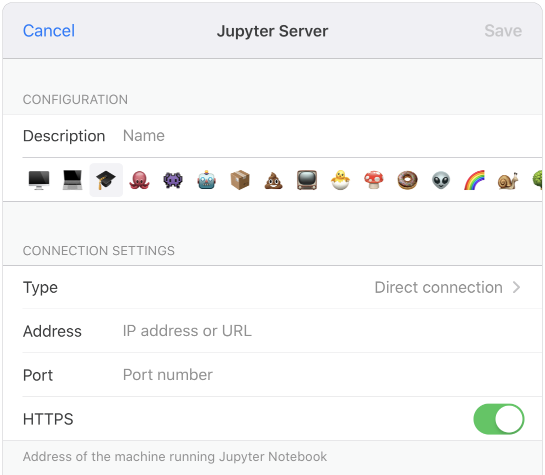
Add a new server configuration, and make sure to select “Direct connection” as connection type.

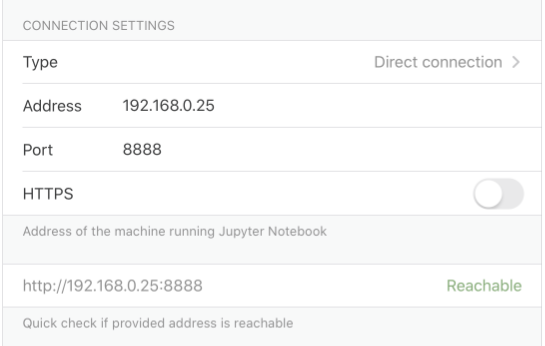
Address
If you are connecting to a Jupyter server in your local network, you should use its local IP address or name. You could use ipconfig/ifconfig command-line commands, where ipconfig should give you full information about networking interfaces on Windows, and ifconfig is its equivalent tool in Linux. For macOS, you can get your local IP using this terminal command:
ipconfig getifaddr en0
Please, mind that if you have configured a public Jupyter server, so that you can connect to it from outside of your local network, you should use server’s public IP address or host name.
Check console where your Jupyter instance is running for the exact address you need to use; recent JupyterLab installations require adding a /lab to the server address, for example.
Port
Use the port where your Jupyter instance is running. The default is 8888, but you can double-check the actual value in the terminal, where Jupyter displays the URL it’s running at — see the “The Jupyter Notebook is running at:” message.
If you have configured a public Jupyter server, there is a fair chance that your router’s security settings won’t allow incoming connections on Jupyter’s port by default. If this is the case, you will need to open them — or, alternatively, consider using port forwarding instead.
HTTP/HTTPS
If you are connecting to a Jupyter server in your local network, which itself is secure, it should be safe to use plain HTTP. Switch off HTTPS and you should now be able to connect to your Jupyter server.
If you have configured a public Jupyter server, you should have also created SSL/TLS certificates and configured Jupyter to use them. This means that your server will only be available via HTTPS, and you should leave HTTPS setting enabled.
Troubleshooting
You can check if your server’s settings are correct with a basic connection checker at the bottom of the server configuration screen. It displays the resulting URL, which Juno Connect will use to connect to your server, and if this URL is currently accessible.

- If it says “Unreachable”, this typically means that there is an issue on the networking side, or in Jupyter configuration: say, Jupyter is not running, or server’s address is incorrect, or perhaps its configuration doesn’t allow incoming connections.
- If it says “Untrusted”, this means that Juno Connect can reach the server, but SSL/TLS certificate verification has failed. Make sure to follow all steps in the SSL/TLS tutorial: Accessing Jupyter on iOS over HTTPS, otherwise kernels in your notebooks will not be able to connect.
- If it says “Reachable”, this means that the server is configured correctly. If your server is secured with a password or security token, you should be able to provide it the first time you connect.